How to create and post a gig on Fiverr in 6 simple steps
How to create a gig on Fiverr:
Fiverr is one of the easiest way to start your freelancing journey. It is easy to create an account and start listing your skills.
But, getting the first order is not as easy as it is to create an account. You will have to create a gig that can attract buyers. A gig is the page that lists the service you are offering.
You will deal with people you have never met before. Even if you are an expert on what you are offering, how come other people will know that?
The gig page is equally important as the profile page.
In this post, I will show you how to create a gig in Fiverr. You can follow these steps for any type of gig that you are offering.
Before you create your gig:
Before you start creating the gig, make sure that you have converted the account to a seller account. After you create an account, by default it is a buyer account. This account can be used to buy services from other sellers.
But, if you are creating a gig, it means that you are selling something to other users. And you need to convert your account to a seller account for that.
If it is a new account, click on the Become a seller button on the top bar to convert it to a seller account. You need to fill few data to complete the process.
Once it is done, you can switch between your accounts. For example, the below screenshot is for a account which is currently logged in as a buyer’s account. You can click on the Switch to Selling button to change it to a seller account.
If you click on that button, it will switch to the seller dashboard and that button will change to Switch to Buying.
Now, let’s check the steps to create a new Gig in Fiverr.
Step 1: Open the Gigs window:
Click on the Gigs button on the top navigation bar. This button will be shown if you are in seller’s account, you will see the Gigs button.
It will show all gigs that you have. It will show gigs in different categories like active, pending approval, requires modifications, draft, denied and paused.
Step 2: Create a Gig:
Click on the Create a new Gig button on top right side of the above window. It will show you 6 steps to fill.
a) Overview:
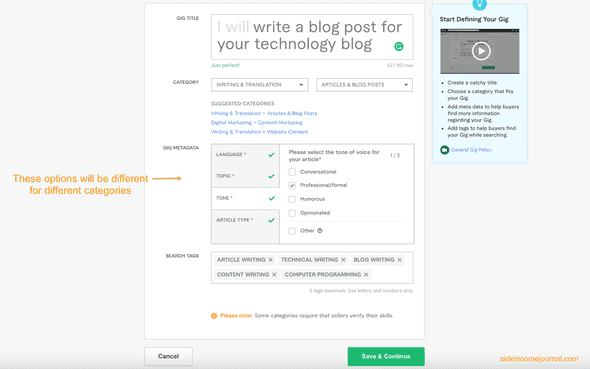 On the overview page, you need to fill the following details:
Gig Title:
This is the title of your gig. Add a catchy title that defines what you can deliver. You can use maximum of 80 characters. Each gig starts with I will. So, you have to complete the line after these two words.
Category and Subcategory:
The category tab is a dropdown of predefined categories. Select the one for your gig. The Subcategory tab is another dropdown with different sub-categories for the selected category.
Gig Metadata:
Once you fill both category and subcategory fields, it will show you different properties or metadata to select. It makes easier to find and buy for buyers.
Search Tags:
These are tags, you can add up to 5 tags. Once you start writing something in this box, it will recommend you different tags and you can select from them.
Once you fill these, click on the Save and continue button to move to the next page.
b) Pricing and packages:
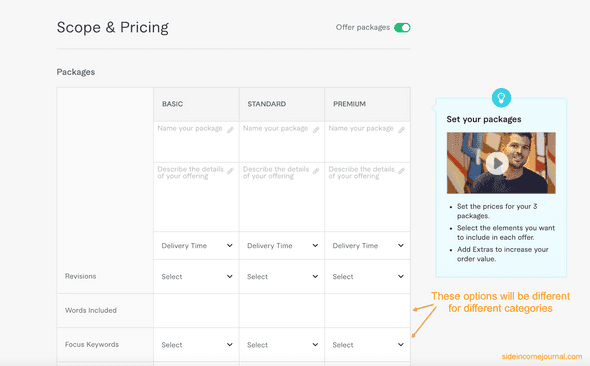
This page is to set your pricing and offer different packages for your work. This page will be different for different types of gigs. For example, if you are creating a gig on article writing, then you will see options like words included, focus keyword etc. But, if you are creating a gig on graphics design, this options will be different.
You can click on the switch Offer packages on top right corner of this page to turn the packages off or on.
Set the name and descriptions:
You can give different names for the packages. For example, you can give bronze for the lowest package, silver for the next package and gold for the highest packages. Each package will provide different offers to buyers.
Also, write a brief description for each package. You can add maximum of 100 characters on this field.
Delivery time:
Set feasible delivery time for each of these packages. Make sure to give time as per your capability.
Revision and price:
Revision is the number of revision you are willing to offer. If the buyer is not happy with your work, he can ask for a revision. If you offer 3 revisions, you will have to change the work as per the request up to three times.
The price field is the pricing of your packages. You can set a price between $5 to $995. You can change the price for your gigs in future. So, you can start with low price and change it to higher once you start getting orders.
The basic package should have the lowest price, standard should have mid and premium the highest.
Add extra to your gig:
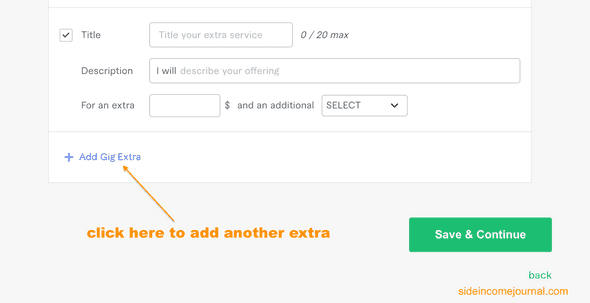
Click on the Add Gig Extra button to add any extra values to your gig. You need to add a small title, description, extra amount and additional time for that extra gig.
Once you are done, you can click on the save and continue button to move to the next page.
c) Description and FAQ:
This page needs you to enter the description of the gig and FAQ or frequently asked questions.
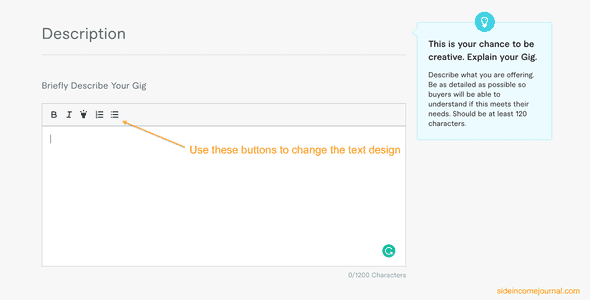
Description:
The first text box is to enter the description of the gig. This description should be at least 120 characters long and you can add up to 1200 characters. Describe in details what you are offering and why you are the perfect person for this job.
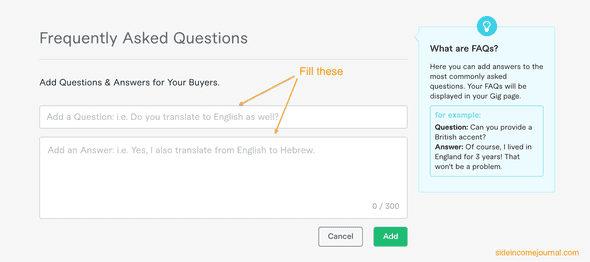
FAQ:
Click on the Add FAQ button to add a frequently asked question and answer. You can add multiple FAQs.
Once done, click on Save and Continue.
d) Requirements:
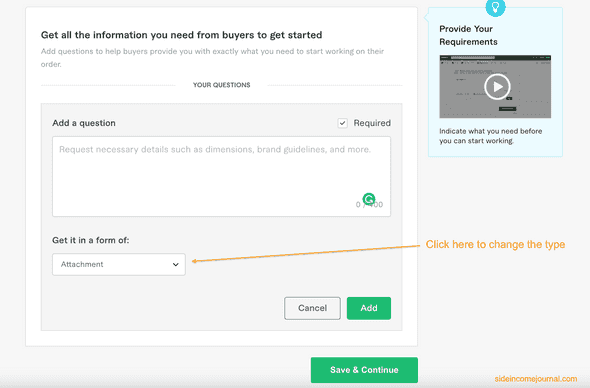
This page is to mention the requirements to start your gig. For example, if you are working on image editing, you need the image to start your gig.
You need to add a question and an answer from the buyer. You can take the answer in three forms:
1. Free text:
Buyer will write down the answer to your question in free text.
2. Multiple choice:
You will provide different choices and buyer will click on one.
3. Attach file:
Buyer will attach a file.
You can click on the required checkbox to mark it mandatory.
You can add multiple questions here. Click on Save and continue to move to the next page.
e) Gallery:
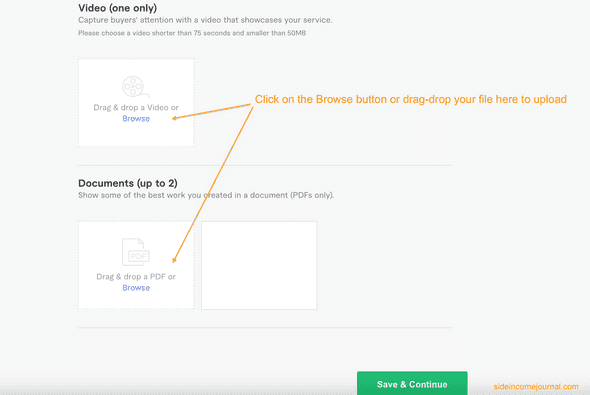
On this page, you can add images, one introductory video and document files to showcase types of works you have done.
- You can add upto 3 images. You need to upload in JPEG, JPG or PNG format with a minimum 550 pixel width and 370 pixel height
- You can upload only 1 video. It should be shorter than 75 seconds and smaller than 50MB.
- You can upload upto 2 documents. All documents should be PDF.
Click on Save and continue once you are done.
f) Publish the Gig:
This is the final page to publish your gig. If you are publishing for the first time, you might get some other options like:
- Fill your tax info
- Verify you phone number
- Complete a specific test.
For example, you might need to complete a test before publishing the gig:
This is only for one time.
Once you are done, you can click on Publish Gig button to publish it.
That’s all, once it is published, buyer’s can place orders. You can also edit a gig if you want.


